![]()
|
|
Reshaping Arcs |
![]()
The Reshape tool is used to reshape arcs, grids and paths. You
can select objects with the Reshape tool in the same manner as
the Object tool, but you should use the Reshape tool only to reshape
these three types of objects.
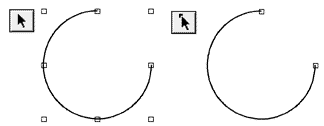
When you select an arc or pie with the Reshape tool, handles appear at the start and end angles. Note the difference when you select an arc with the Reshape tool instead of the Object tool.
To change the start and end angles with the mouse: Drag the arc handles to the desired positions.

To change the start and end angles with the Edit palette: Enter new start and end angle coordinates.
![]()
To change the arc type: Select Ellipse, Arc or Pie from the Type pop-up in the Edit Palette.
When you select a grid with the Reshape tool, handles appear at the four corners.

To change the number of horizontal and vertical cells: In the Edit Palette enter the number of horizontal and vertical cells. Two cells will give you one divider.
![]()
The Reshape tool allows you to edit the points in a path instead of its bounding box. You can add, delete, move and edit point handles after selecting a path with the Reshape tool. When you select a path with the Reshape tool, handles appear at each point. Note the difference when you select a path with the Reshape tool instead of the Object tool.
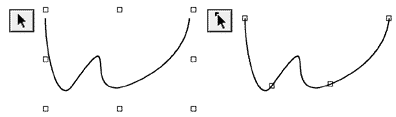
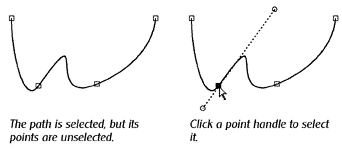
When you select a path with the Reshape tool, point handles will appear at each point position and the mouse pointer will change to a reshape arrow. The point handles will be unselected (hollow).
The Reshape Cursor
To select a point: Click on the point handle with the reshape arrow. Selected point handles are solid, while unselected handles are hollow. If the point is connected to a curve, a curve handle will appear to show the position of the Bezier control point.
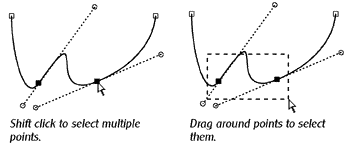
To select multiple points: Hold down a Shift key and click on the points, or drag around the points. Selecting points is very similar to selecting objects.
Click on the Previous or Next point buttons to select another point on the path.
Previous Point
Next Point
To move a point with the mouse: Select a point with the Reshape tool and drag the point. Hold down Shift to constrain movement to horizontal, vertical and 45 directions. If Snap-to-Grid or Snap-to-Guides are selected in the Layout menu, points will be aligned with the closest grid point or guides. To move multiple points, select all of them and then drag any one of them.
To move a point with the Edit palette: Select one point to edit. Enter new coordinates, or add the move amount to the current coordinates. For example, enter 3.31"-2.25 to move a point 2.25" to the left when the current value is 3.31".
To move a point with the cursor keys: Select a point, or multiple points, with the Reshape tool. Press the arrow keys to move. The coordinates are shifted by the value set in Nudge Amount in the Drawing panel in Preferences. Hold down a Shift key while using the arrows to nudge object(s) a tenth of the amount. Points will be not be aligned with the closest grid point or guides.
Each curve segment has two curve handles which control the shape of the curve. When you select one of the endpoints of a curve, PageStream shows a direction line connecting the point to its curve handle (two handles if the point joins two curves).
To adjust a curve with the mouse: Drag a curve handle to a new position. Moving a curve handle attached by a smooth join to another curve will reshape both curves. To change to a corner join, hold down Option (Alt) while dragging.
If the segments are connected by a corner join, you can hold down Option (Alt) as you drag to change to a smooth join.
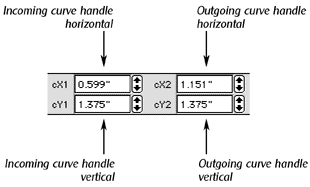
To adjust a curve with the Edit palette: Select one point to edit. Enter new coordinates for its curve handle(s), or add the move amount to the current coordinates. For example, enter 2.61"+1.82 to move a point 1.82" to the right when the current value is 2.61".
You can change curve segments to line segments and vice versa with the Reshape tool.
To retract curve handles to change curves to lines: Hold down Option (Alt) and click on the point. The curve handles for the segments on either side of the point will disappear and the segments on either side of the point will be converted to lines. To retract the curve handle on just one side of the point, drag a curve handle on top of the point.
To add curve handles to lines: Hold down Option (Alt) and drag out from the point. This will add curve handles for a smooth join.
PageStream allows you to add points to a path after it has been drawn, and to delete points that you no longer want.
To add a point to an existing path: Select a path and hold down Option (Alt). Click anywhere on the stroke of the path to add a new point at that position.
To delete a point: Select the point and press the Delete key or click on the Delete Point button in the Edit palette. The points on either side of the deleted point will now be connected. You can delete multiple points by selecting them before pressing Delete or clicking the Delete Point button.
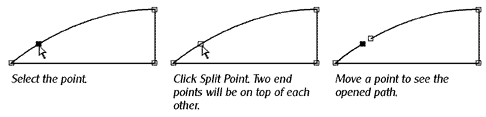
You can open a closed path at any point, or split an open path into subpaths, by splitting a point into two endpoints. PageStream also allows you to join two endpoints to close a path or to join two subpaths into one path.
To split a path point: Select the point. Click the Split Point button in the Edit palette. Two endpoints will appear where the former point was located. One will be selected automatically.
If you split a path that is already open, the result will be two subpaths in one path.
To join two endpoints: Drag an endpoint near another endpoint in the same path. When you are within range, its point handle will turn bold. Release the mouse button to join the points. If you want to join two endpoints without moving them, select the Pen tool, click on one point to make it the current point and then click on or drag to the other endpoint to draw a line or curve segment between them.
The Reshape tool allows you to select and edit the cells in a table instead of editing the entire table. You can insert and delete rows and columns, merge cells into larger cells, dissolve larger cells into original cells, set formulas for cells, and set the width, height, fill and border for cells. Note the difference when you select a table with the Reshape tool instead of the Object tool.

When you select a table with the Reshape tool, object handles will appear at each corner of the table and selected cell's fill will be inverted.
To select a cell: Click anywhere inside a cell. The selected cell's fill will be inverted.
To select multiple cells: Hold down a Shift key and click on the cells, or drag around the cells. Selecting cells is very similar to selecting objects.
To change selected cell with the cursor keys: With a cell already selected, press a cursor key to select the cell above, below, to the right, or to the left.
Using the Reshape tool, rows and columns of new cells can be inserted, and existing rows and columns of cells can be deleted.
To insert a row: Select any cell in the row to insert before. Click the Insert Row button in the Edit palette. A new row of cells will be inserted before the selected row. If more than one row is selected, a new row will be inserted before each. To insert after the selected rows, hold down a Shift key when clicking the Insert Row button.
To delete a row: Select any cell in the row to delete. Click the Delete Row button in the Edit palette. If more than one row is selected, each row will be deleted.
To insert a column: Select any cell in the column to insert before. Click the Insert Column button in the Edit palette. A new column of cells will be inserted before the selected column. If more than one column is selected, a new column will be inserted before each. To insert after the selected column, hold down a Shift key when clicking the Insert Column button.
To delete a column: Select any cell in the column to delete. Click the Delete Column button in the Edit palette. If more than one column is selected, each column will be deleted.
To set the height of a row: Select any cell in the row to adjust. Enter the new height in the H text box. If more than one row is selected, each row's height will be set.
To set the width of a row: Select any cell in the column to adjust. Enter the new height in the W text box. If more than one column is selected, each column's width will be set.
Using the Reshape tool, cells can be joined to form a larger cell that spans across the space of the originally joined cells. Cell border and fill, as well as text, will respect the new size.
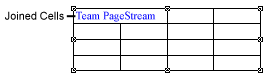
To join adjoining cells: Select any square block of cells grouped either horizontally, vertically, or both. Click the Join Cells button in the Edit palette. The upper-left most selected cell will grow to fill the space. The other selected cells will be deleted.
To split a joined cell: Select the joined cell. Click the Split Cell button in the Edit palette. The existing text will be placed in the upper-left cell of the new cells, and the remaining new cells will be empty.
To set the style of the top border of the cell: Select the cell. Click the Set Cell Top Border button to display the Line dialog box. Select the top border attributes. Click OK.
To set the style of the bottom border of the cell: Select the cell. Click the Set Cell Bottom Border button to display the Line dialog box. Select the bottom border attributes. Click OK.
To set the style of the left border of the cell: Select the cell. Click the Set Cell Left Border button to display the Line dialog box. Select the left border attributes. Click OK.
To set the style of the right border of the cell: Select the cell. Click the Set Cell Right Border button to display the Line dialog box. Select the right border attributes. Click OK.
To set the fill style of the cell: Select the cell. Click the Set Cell Fill button to display the Fill dialog box. Select the fill attributes. Click OK.
Select the cell. Enter the numerical value or formula in the Value text box in the Edit palette. Press enter (once on Mac, twice on Amiga) or click on the apply button (required for Windows).
The Cell text box in the Edit palette tells you what cell you have selected. Cells are lettered from left to right starting with A, and are numbered from top to bottom starting at 1. Joined cells are normally referenced by the upper left cell, but can be referenced by any of the joined cells.
The form to use when entering a formula is an equal sign (=) followed by the mathematical formula. Values in the formula may be added (+), subtracted (-), mulitplied (*), and divided (/). The natural math order is respected, where multiplies and divides are completed before additional and subtractions. By using paranthesis, the natural order may be modified. For example, 3-1*2 will return the result 1, but (3-1)*2 will return the result 4.
Values may be integers (1, 2, 745, etc.), real or floating point numbers (.25, 4.128, etc.), references to the value of another cell (A1, b4, E23, etc.), or functions (ABS(-4.5), COS (.5), log(B2) , SUM(A1:C3), etc.)
The functions supported by PageStream's table features are listed below. Those functions which take a range use the form cell1:cell2 (A1:D1, E10:S20, a4:b4, etc.).
Function Returns ABS(value) Absolute, or positive, of value. ARCSIN(value) Arcsine of value. Radian based result. ARCCOS(value) Arccosine of value. Radian based result. ARCTAN(value) Arctangent of value. Radian based result. AVERAGE(range)
or AVG(range)Average of values in range (sum / number of values). COS(value) Cosine of value. Radian based argument. EXP(value) Exponentiation (base e). INT(value) Integer of value- rounds to whole number. LN(value) Natural logarithm (base e). LOG(value) Common logarithm (base 10). MAX(range) Maximum value of values in range. MIN(range) Minimum value of values in range. SIN(range) Sine of value. Radian based argument. SUM(range) Summation of values in range. TAN(value) Tangent of value. Radian based argument.
|
|